Getting Started Flow
Four simple steps to begin your automated lending journey
Register a Bitfinex Account
Create your Bitfinex account, complete KYC verification, and upgrade to Intermediate level to unlock the funding feature.
Deposit Funds to Bitfinex
Purchase or transfer your cryptocurrency or fiat to your Bitfinex account and move it to the funding wallet.
Activate Your AuGo Bot
Register an account and subscribe to a plan that suits you. New users enjoy a 10-day full-featured free trial.
Complete Bot Setup & Start Earning
Set up your API key on the Bitfinex desktop site and provide the required parameters on the bot's settings page.
Detailed Step-by-Step Guide
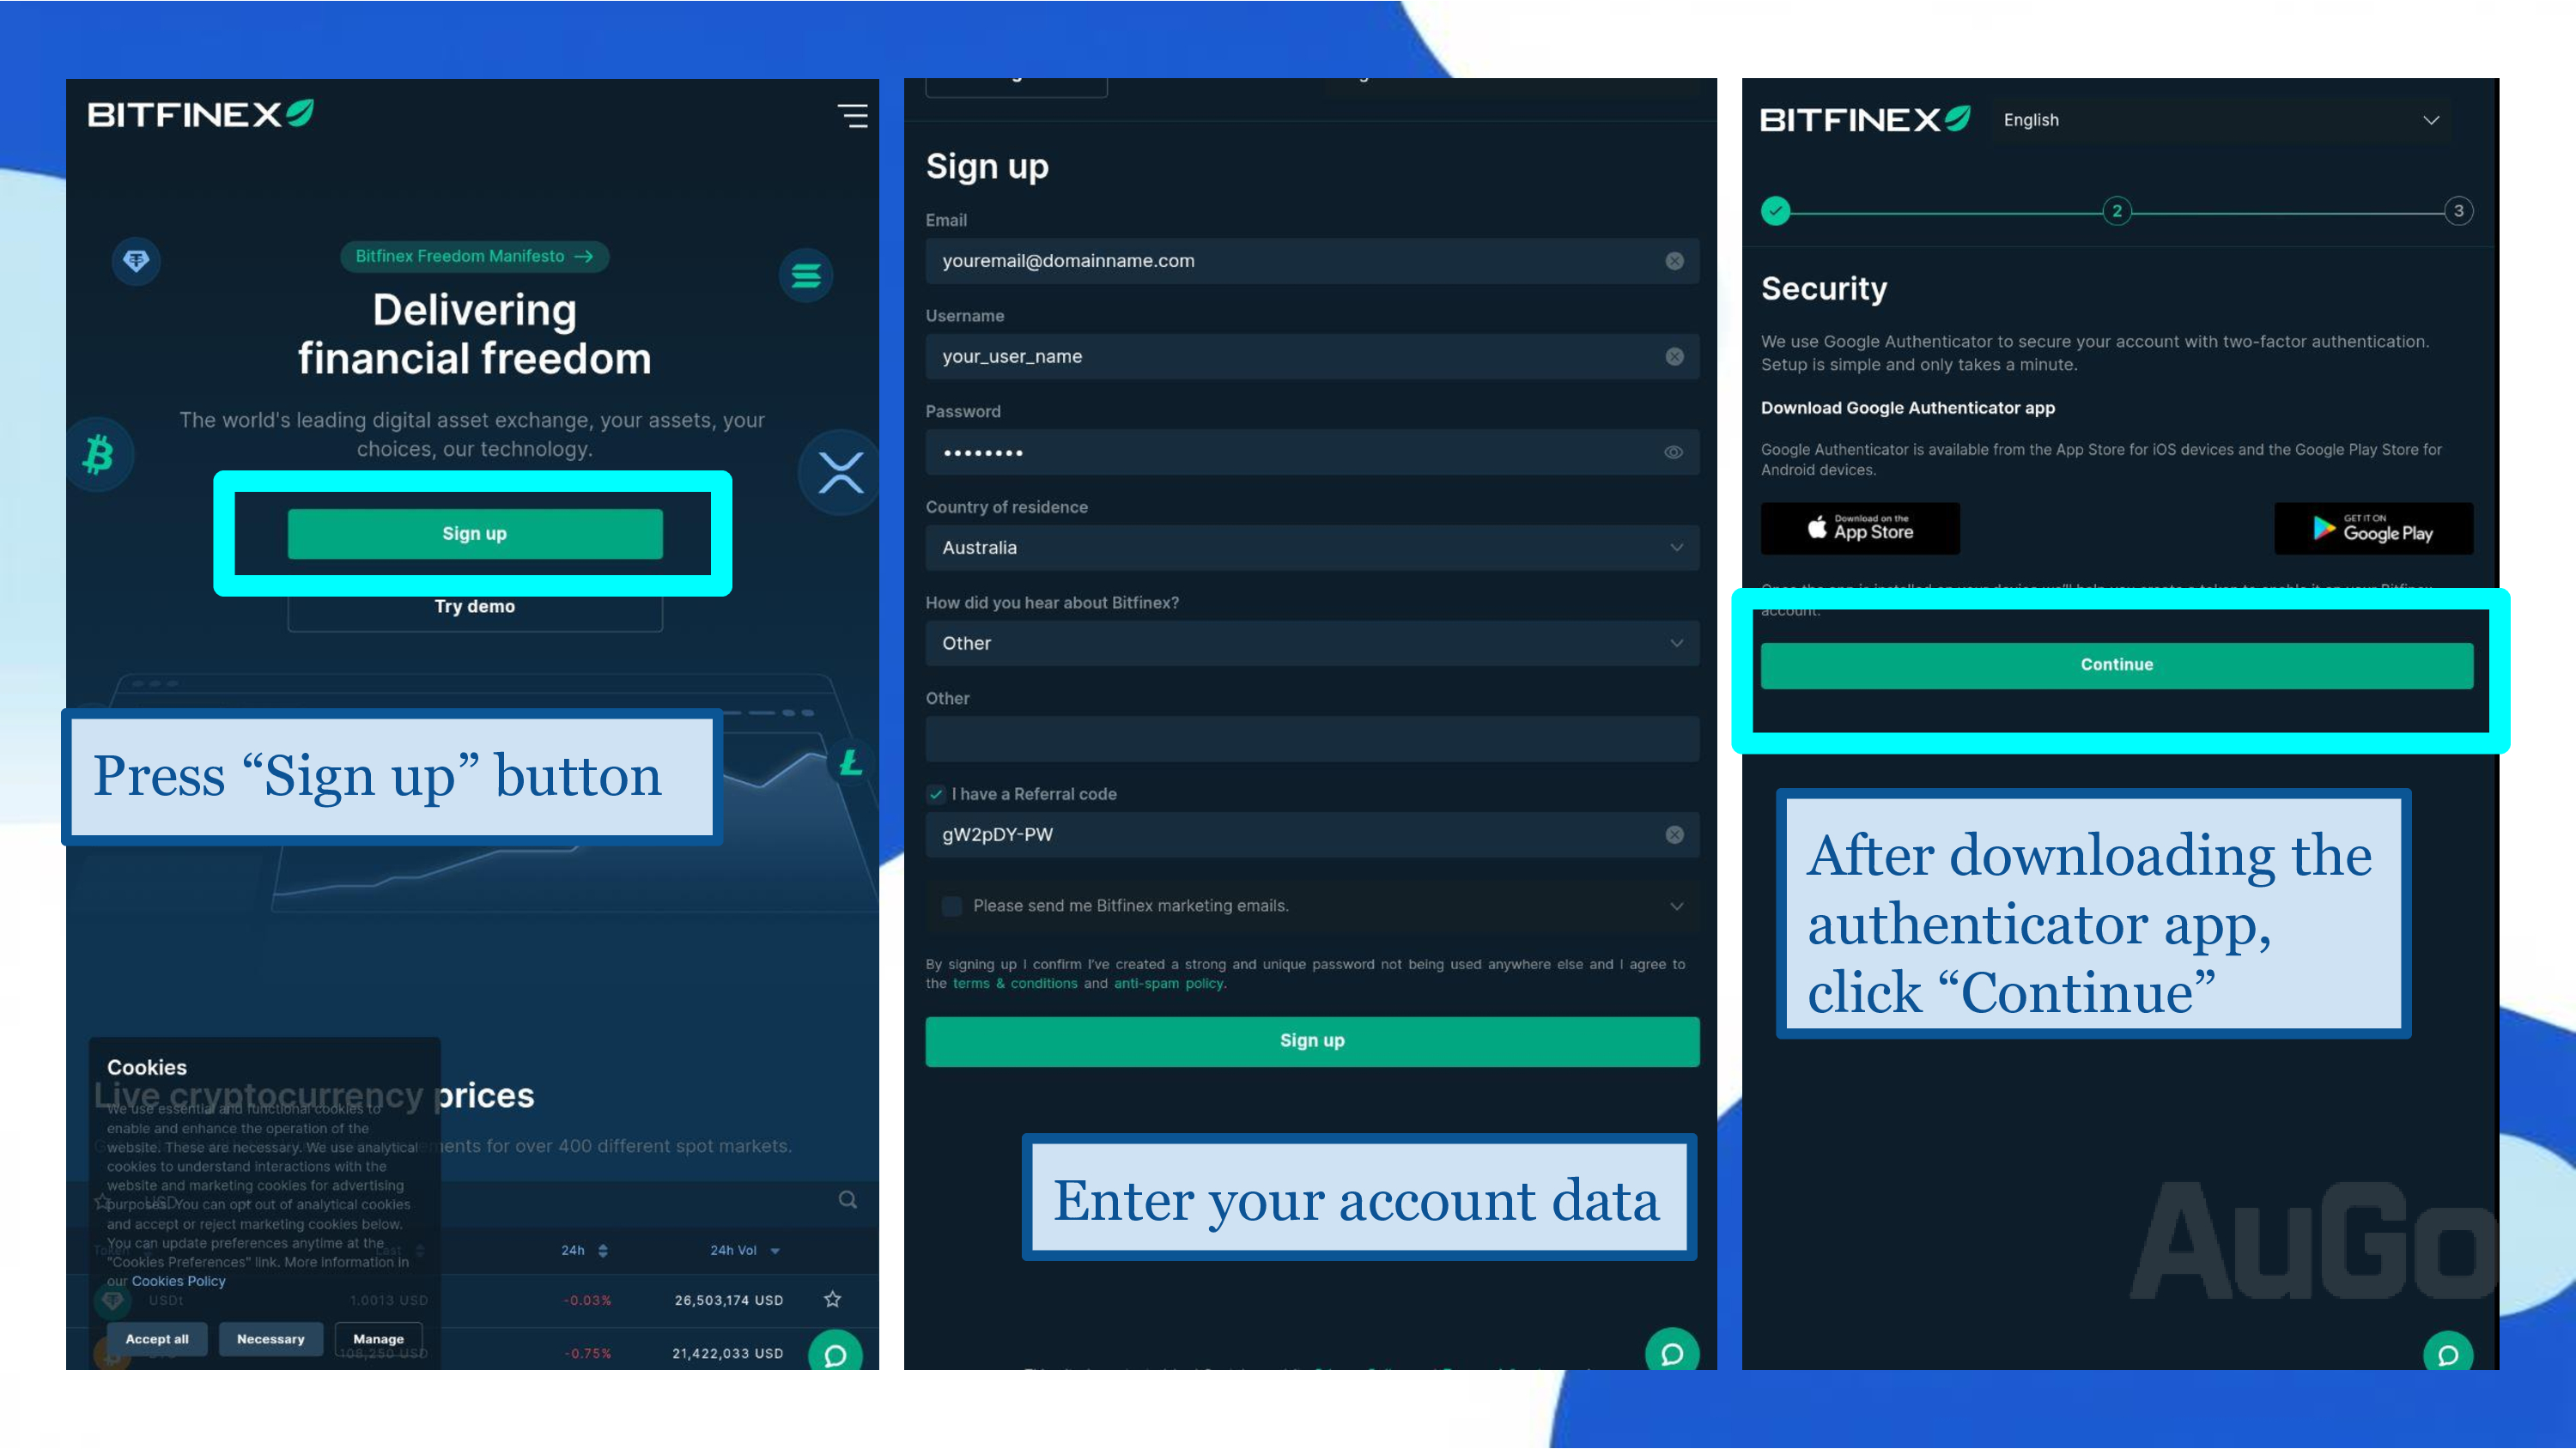
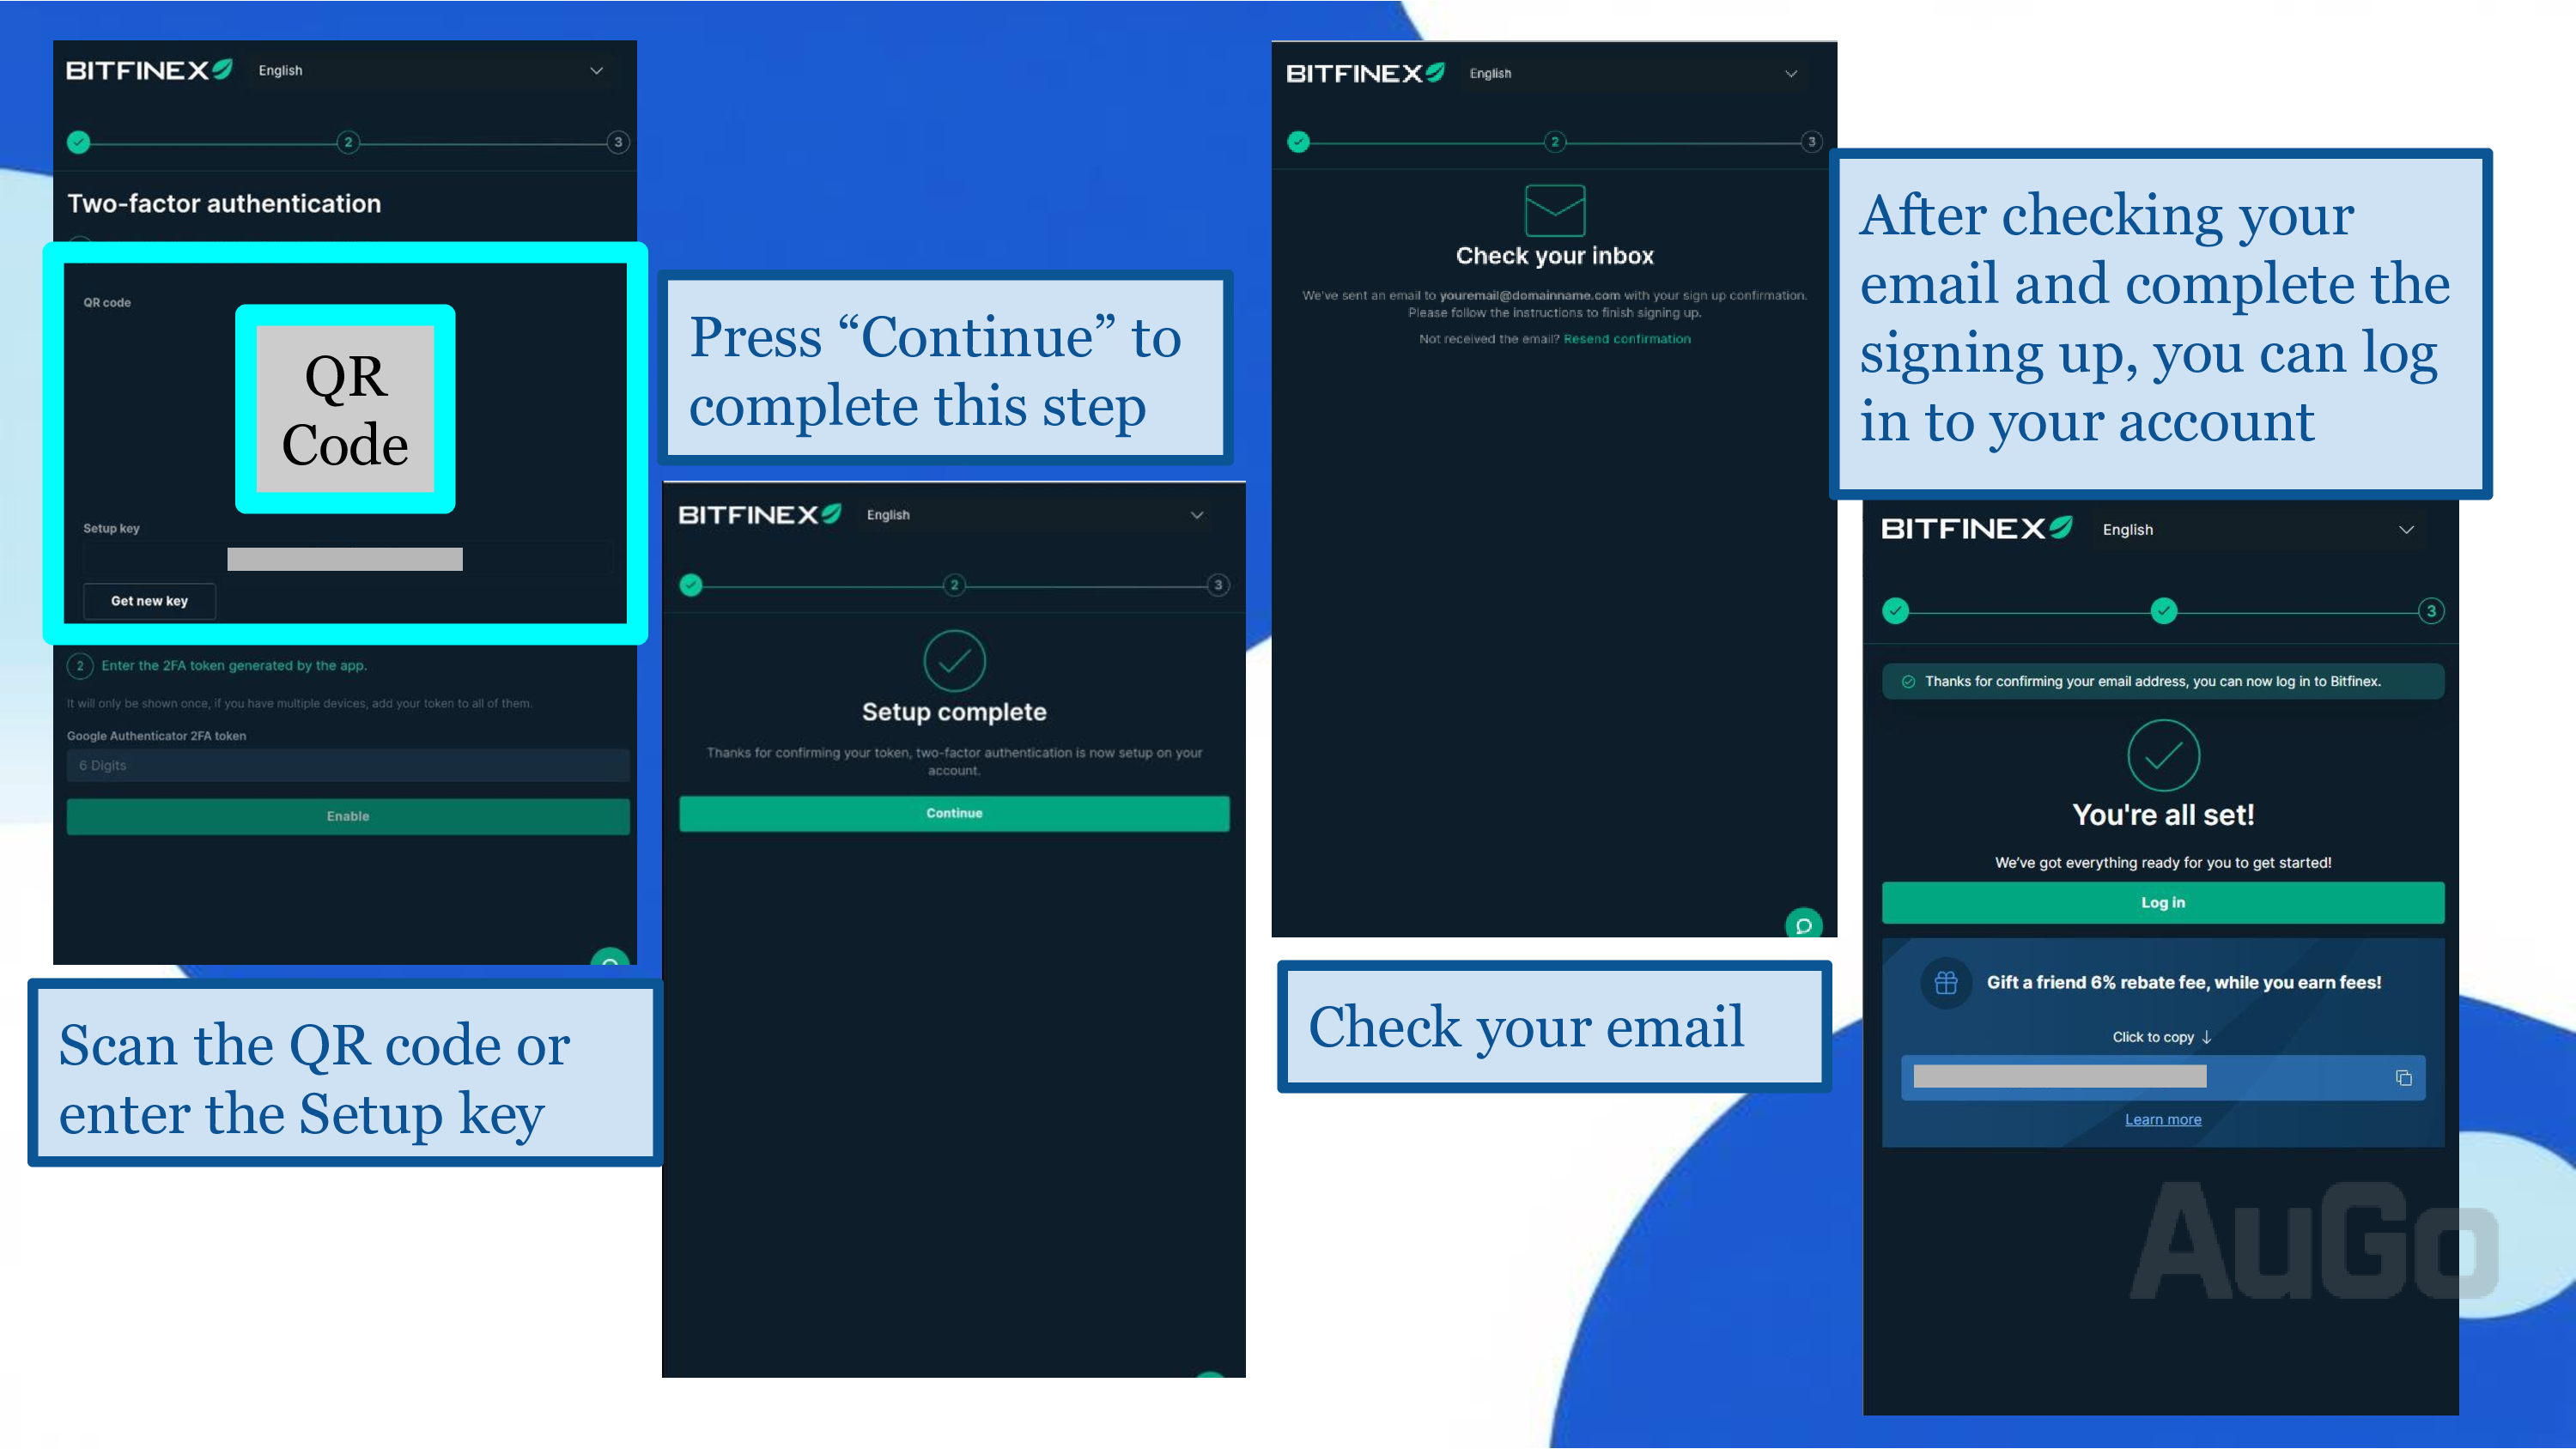
1Step 1: Register a Bitfinex Account and Complete Verification
1. Visit the official Bitfinex website and click "Sign Up".
2. Fill in your email, set a password, and complete the basic information.
3. Complete email and SMS verification.
4. Go to the "Verification" page to submit your KYC documents and upgrade to the "Intermediate" level to use the funding feature.
 Detailed KYC Tutorial
Important: Ensure you can legally use Bitfinex in your location (including Japan). Turn off Bitfinex when using a VPN or traveling in restricted areas, otherwise your account may be suspended, requiring you to contact customer support for reactivation.
2Step 2: Bitfinex Deposits and Fund Transfers
Crypto Deposit
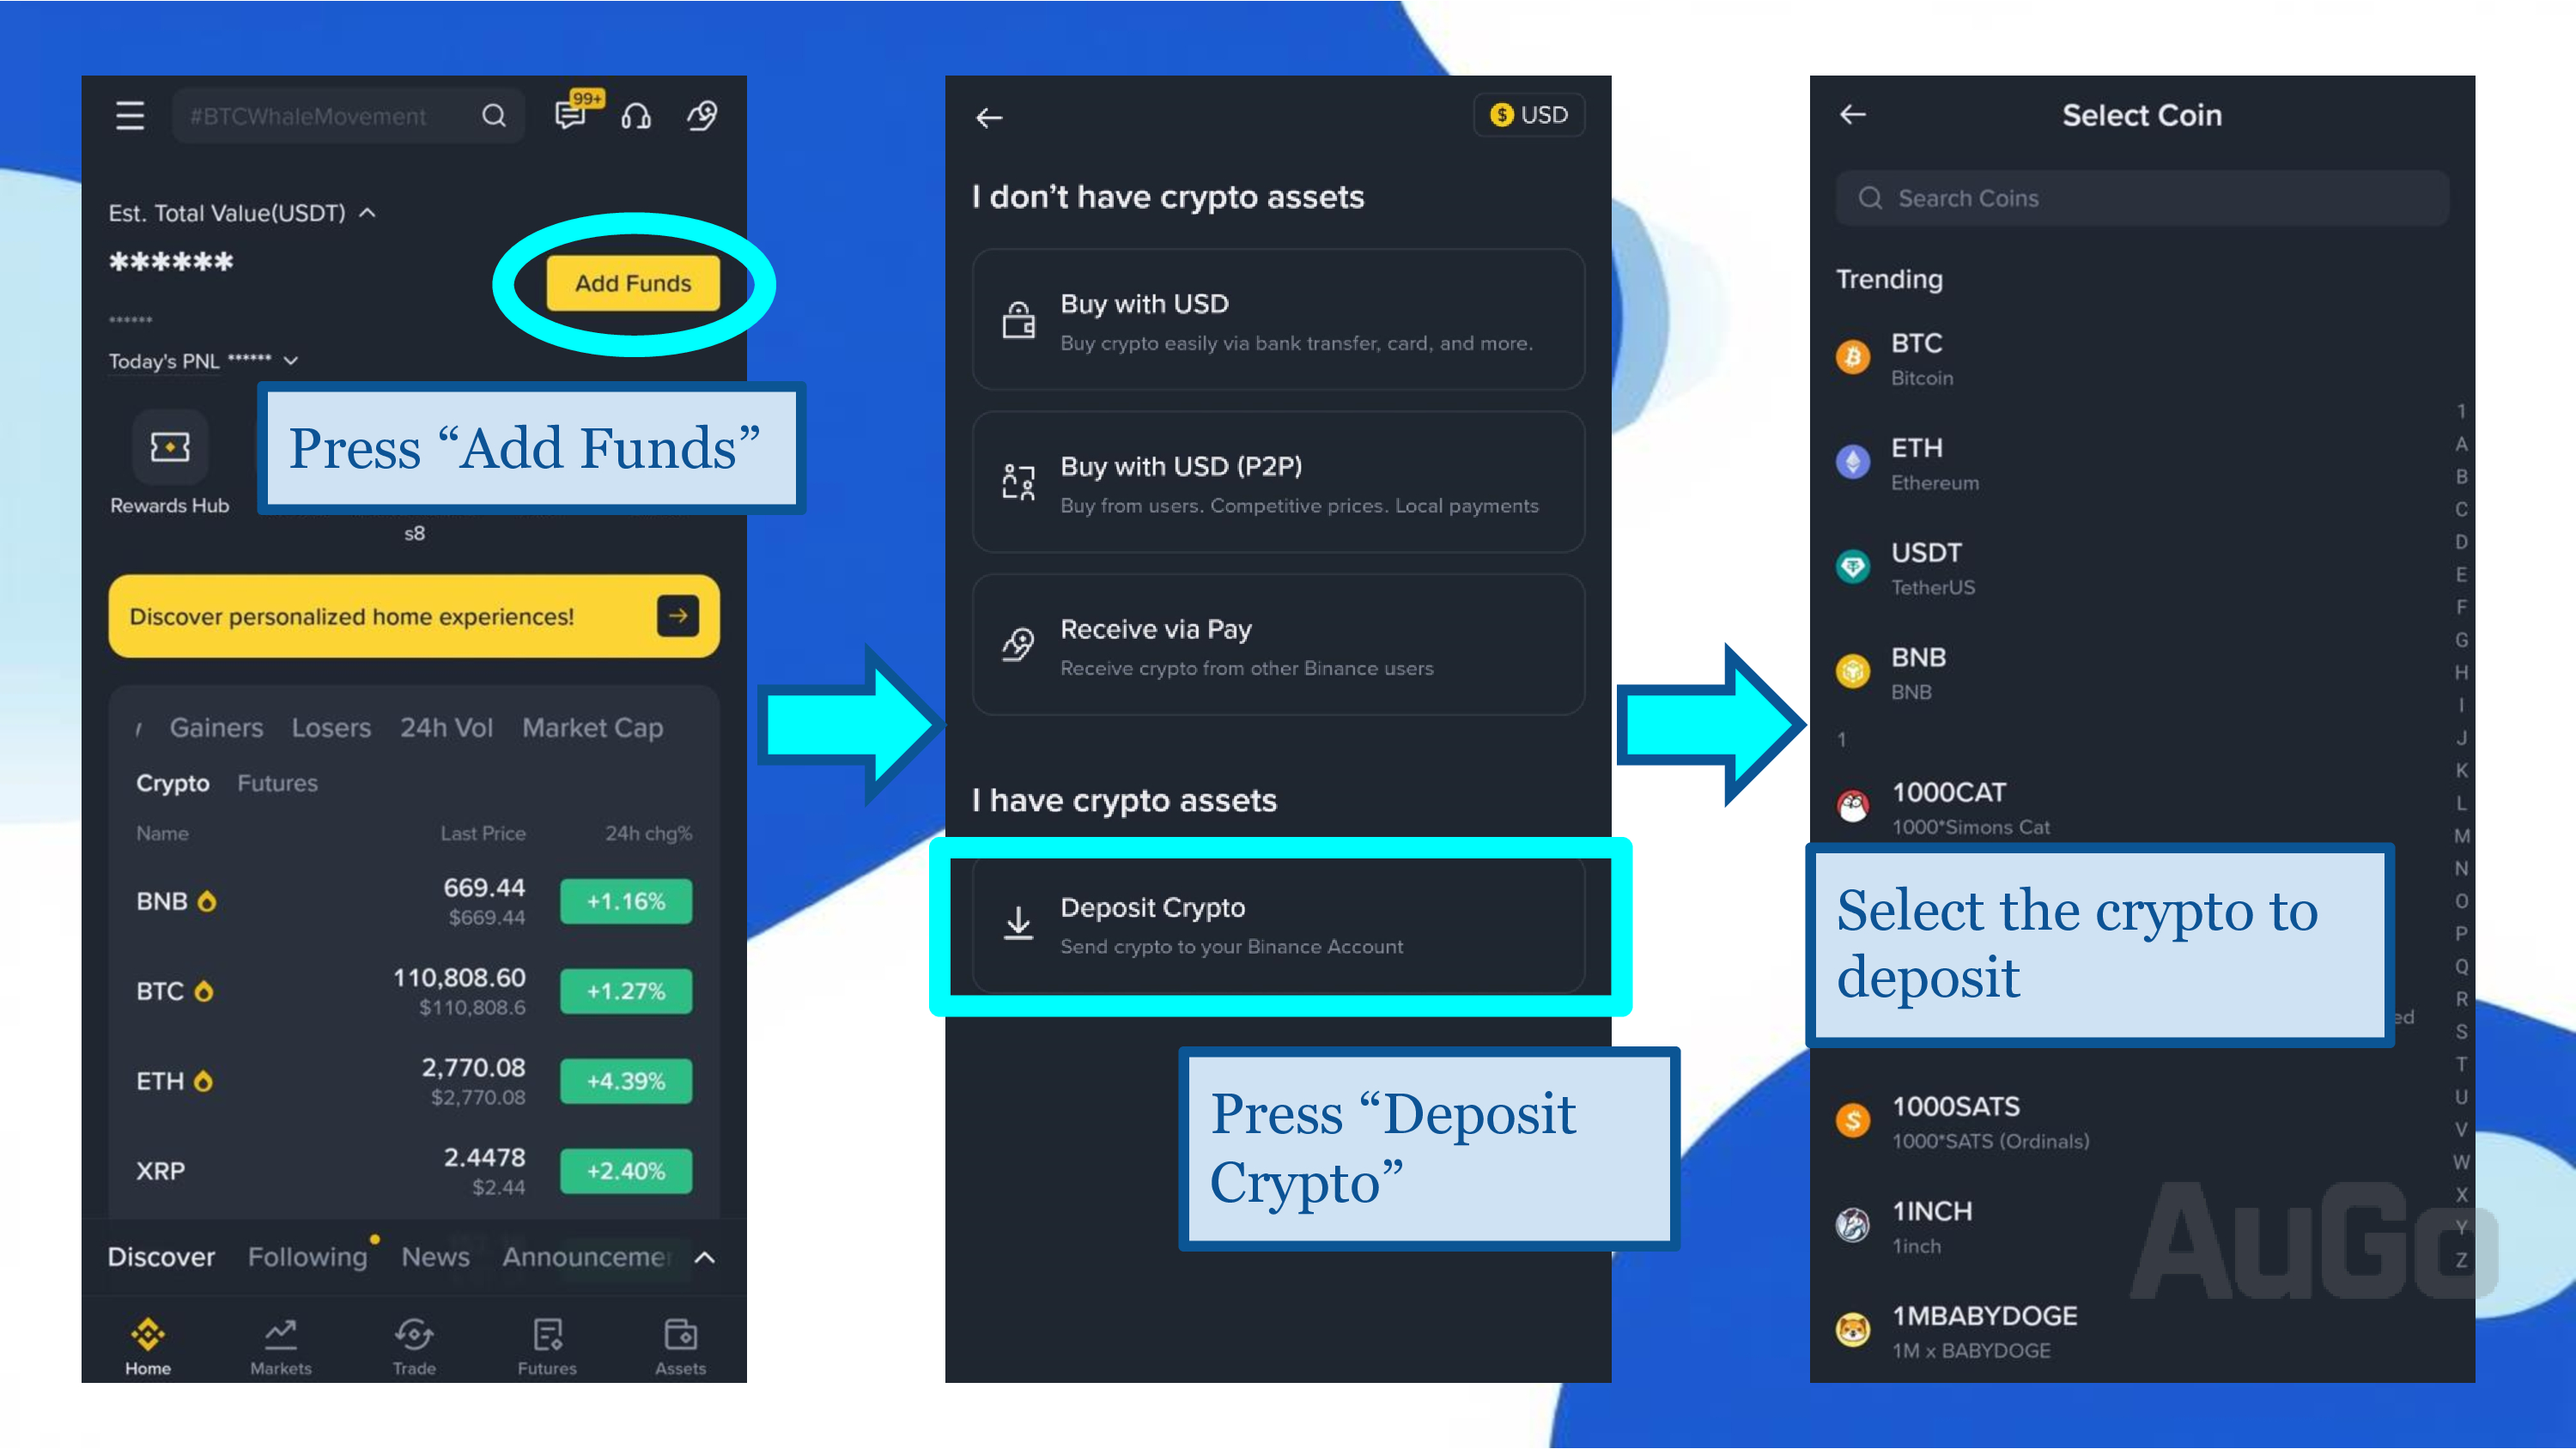
1. After logging into Bitfinex, click "Wallet" → "Deposit".
2. Select the cryptocurrency you want to deposit.
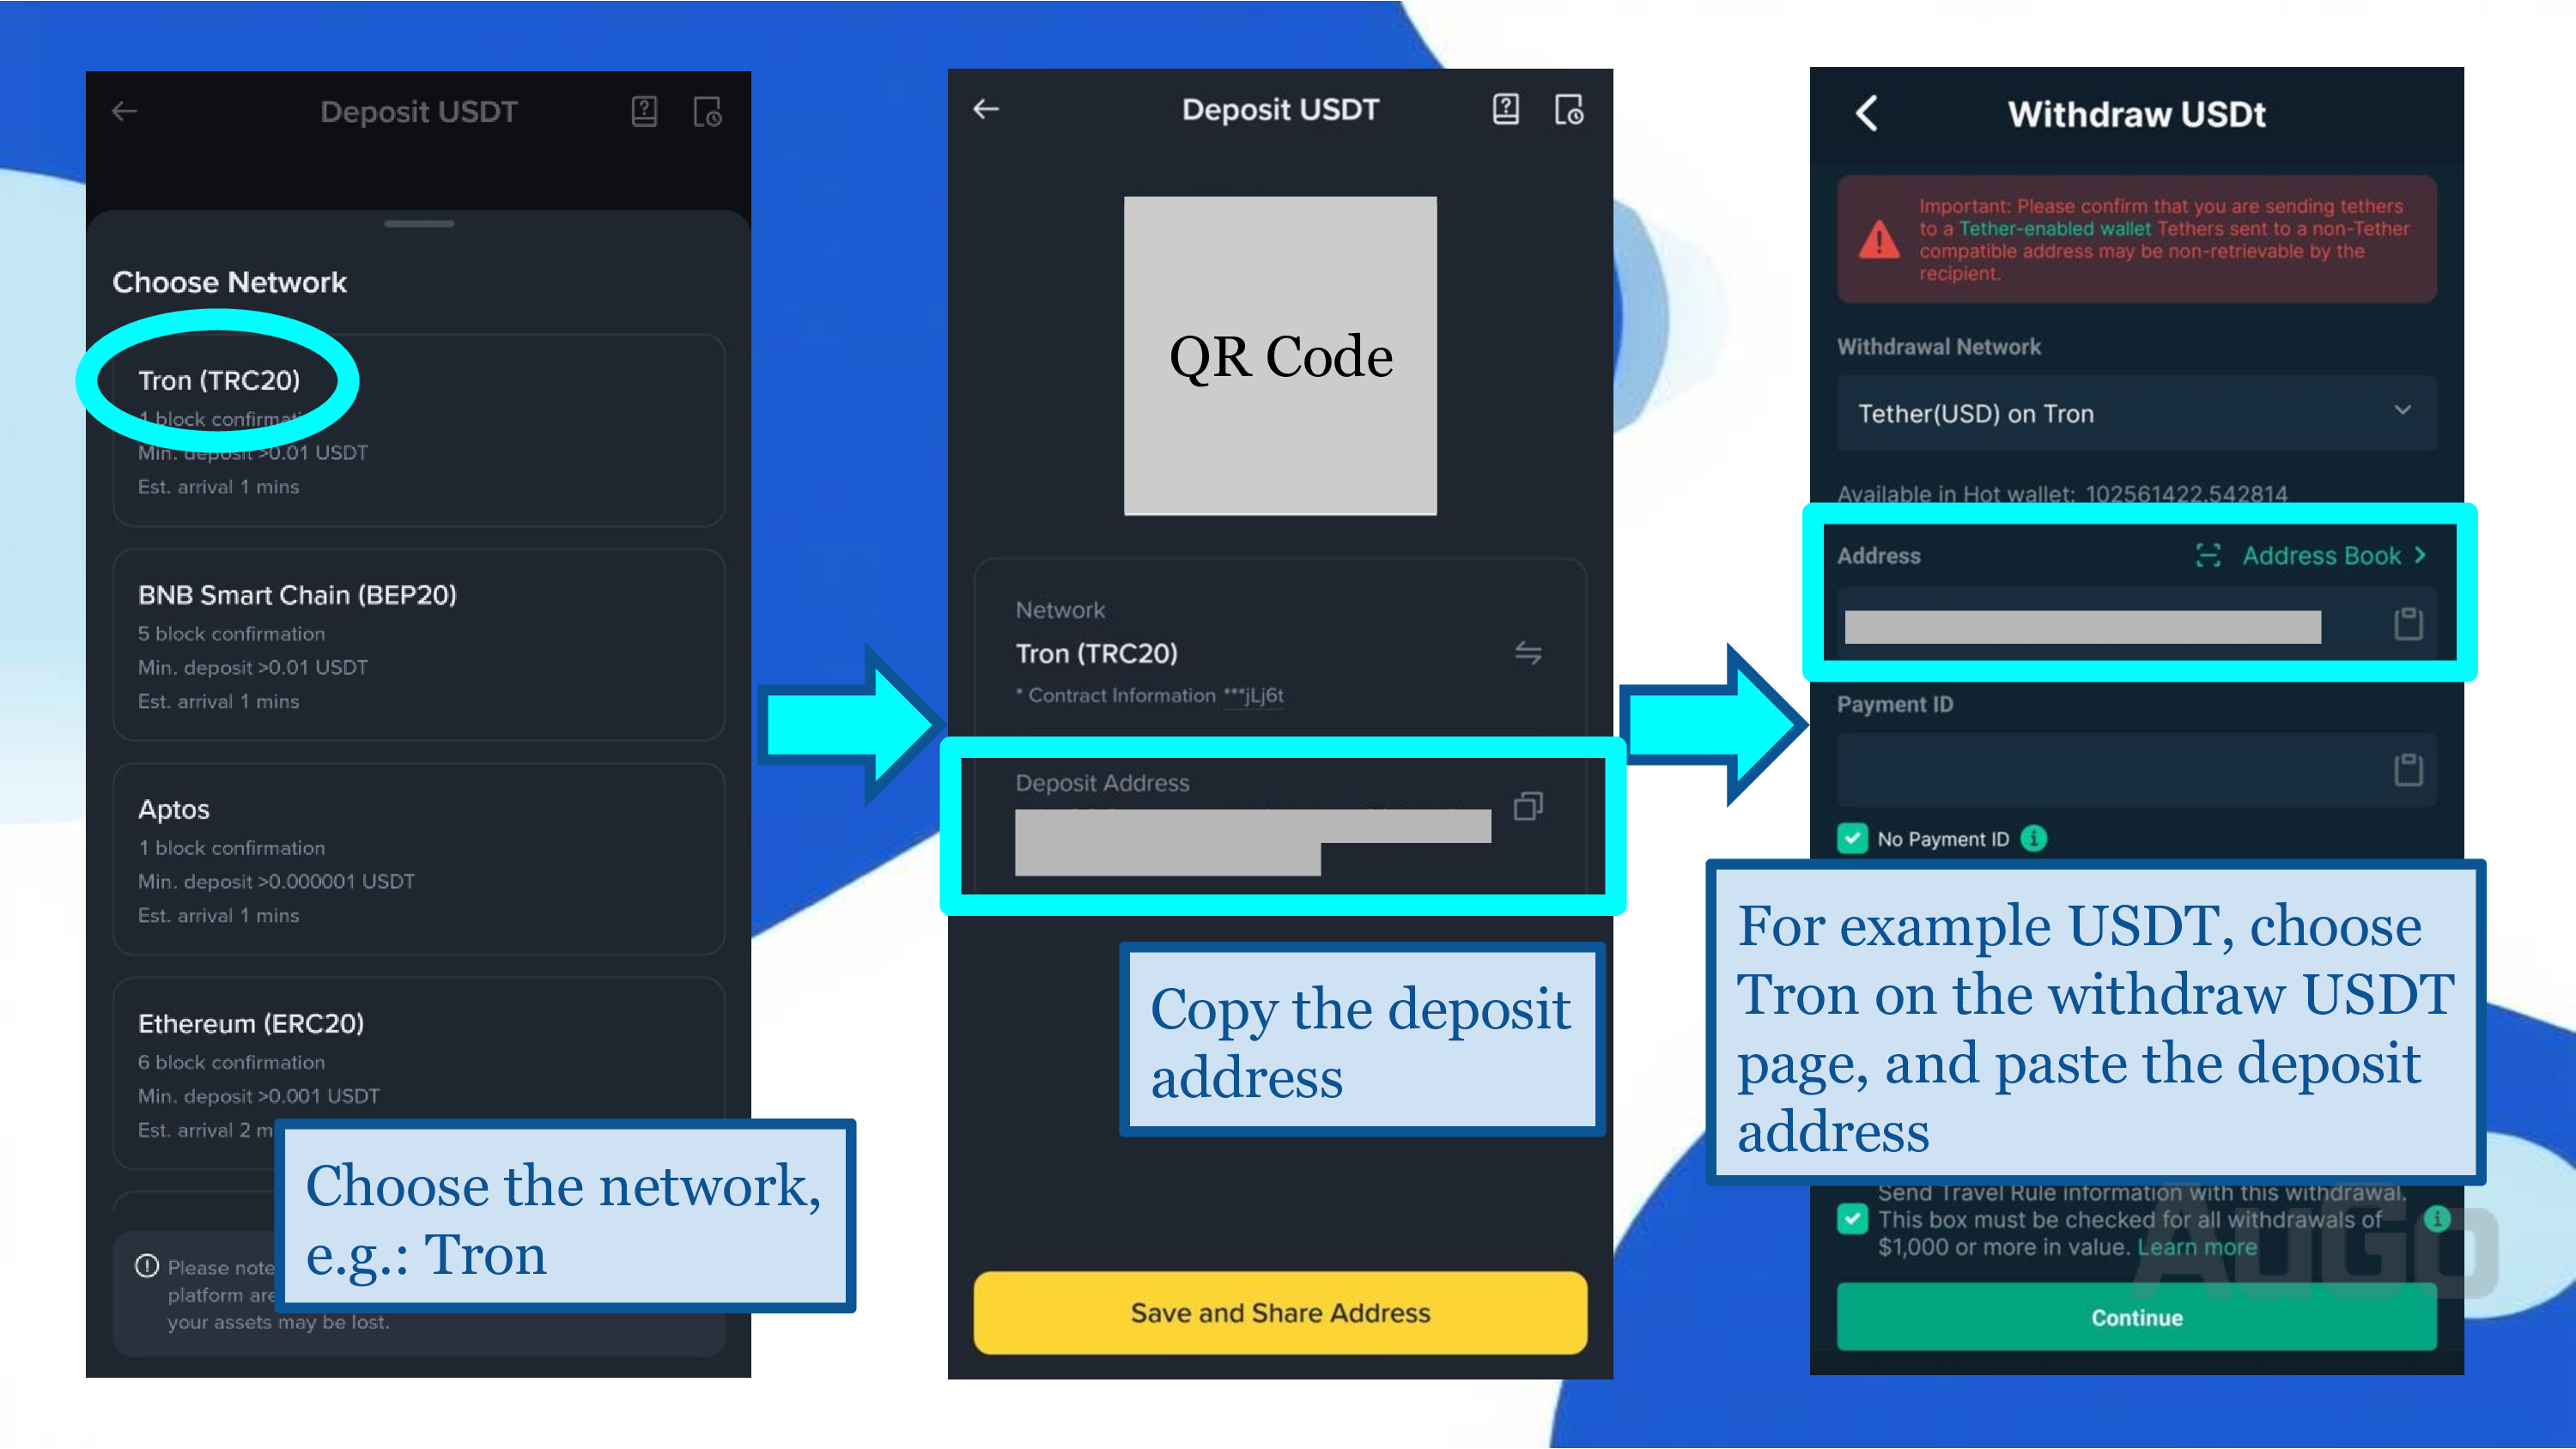
3. Choose the required blockchain network to generate a deposit address or scan the QR code.
4. Transfer funds from another wallet or exchange to this address.

Crucial: Ensure the blockchain network you select matches the sender's network, or your assets will be permanently lost!
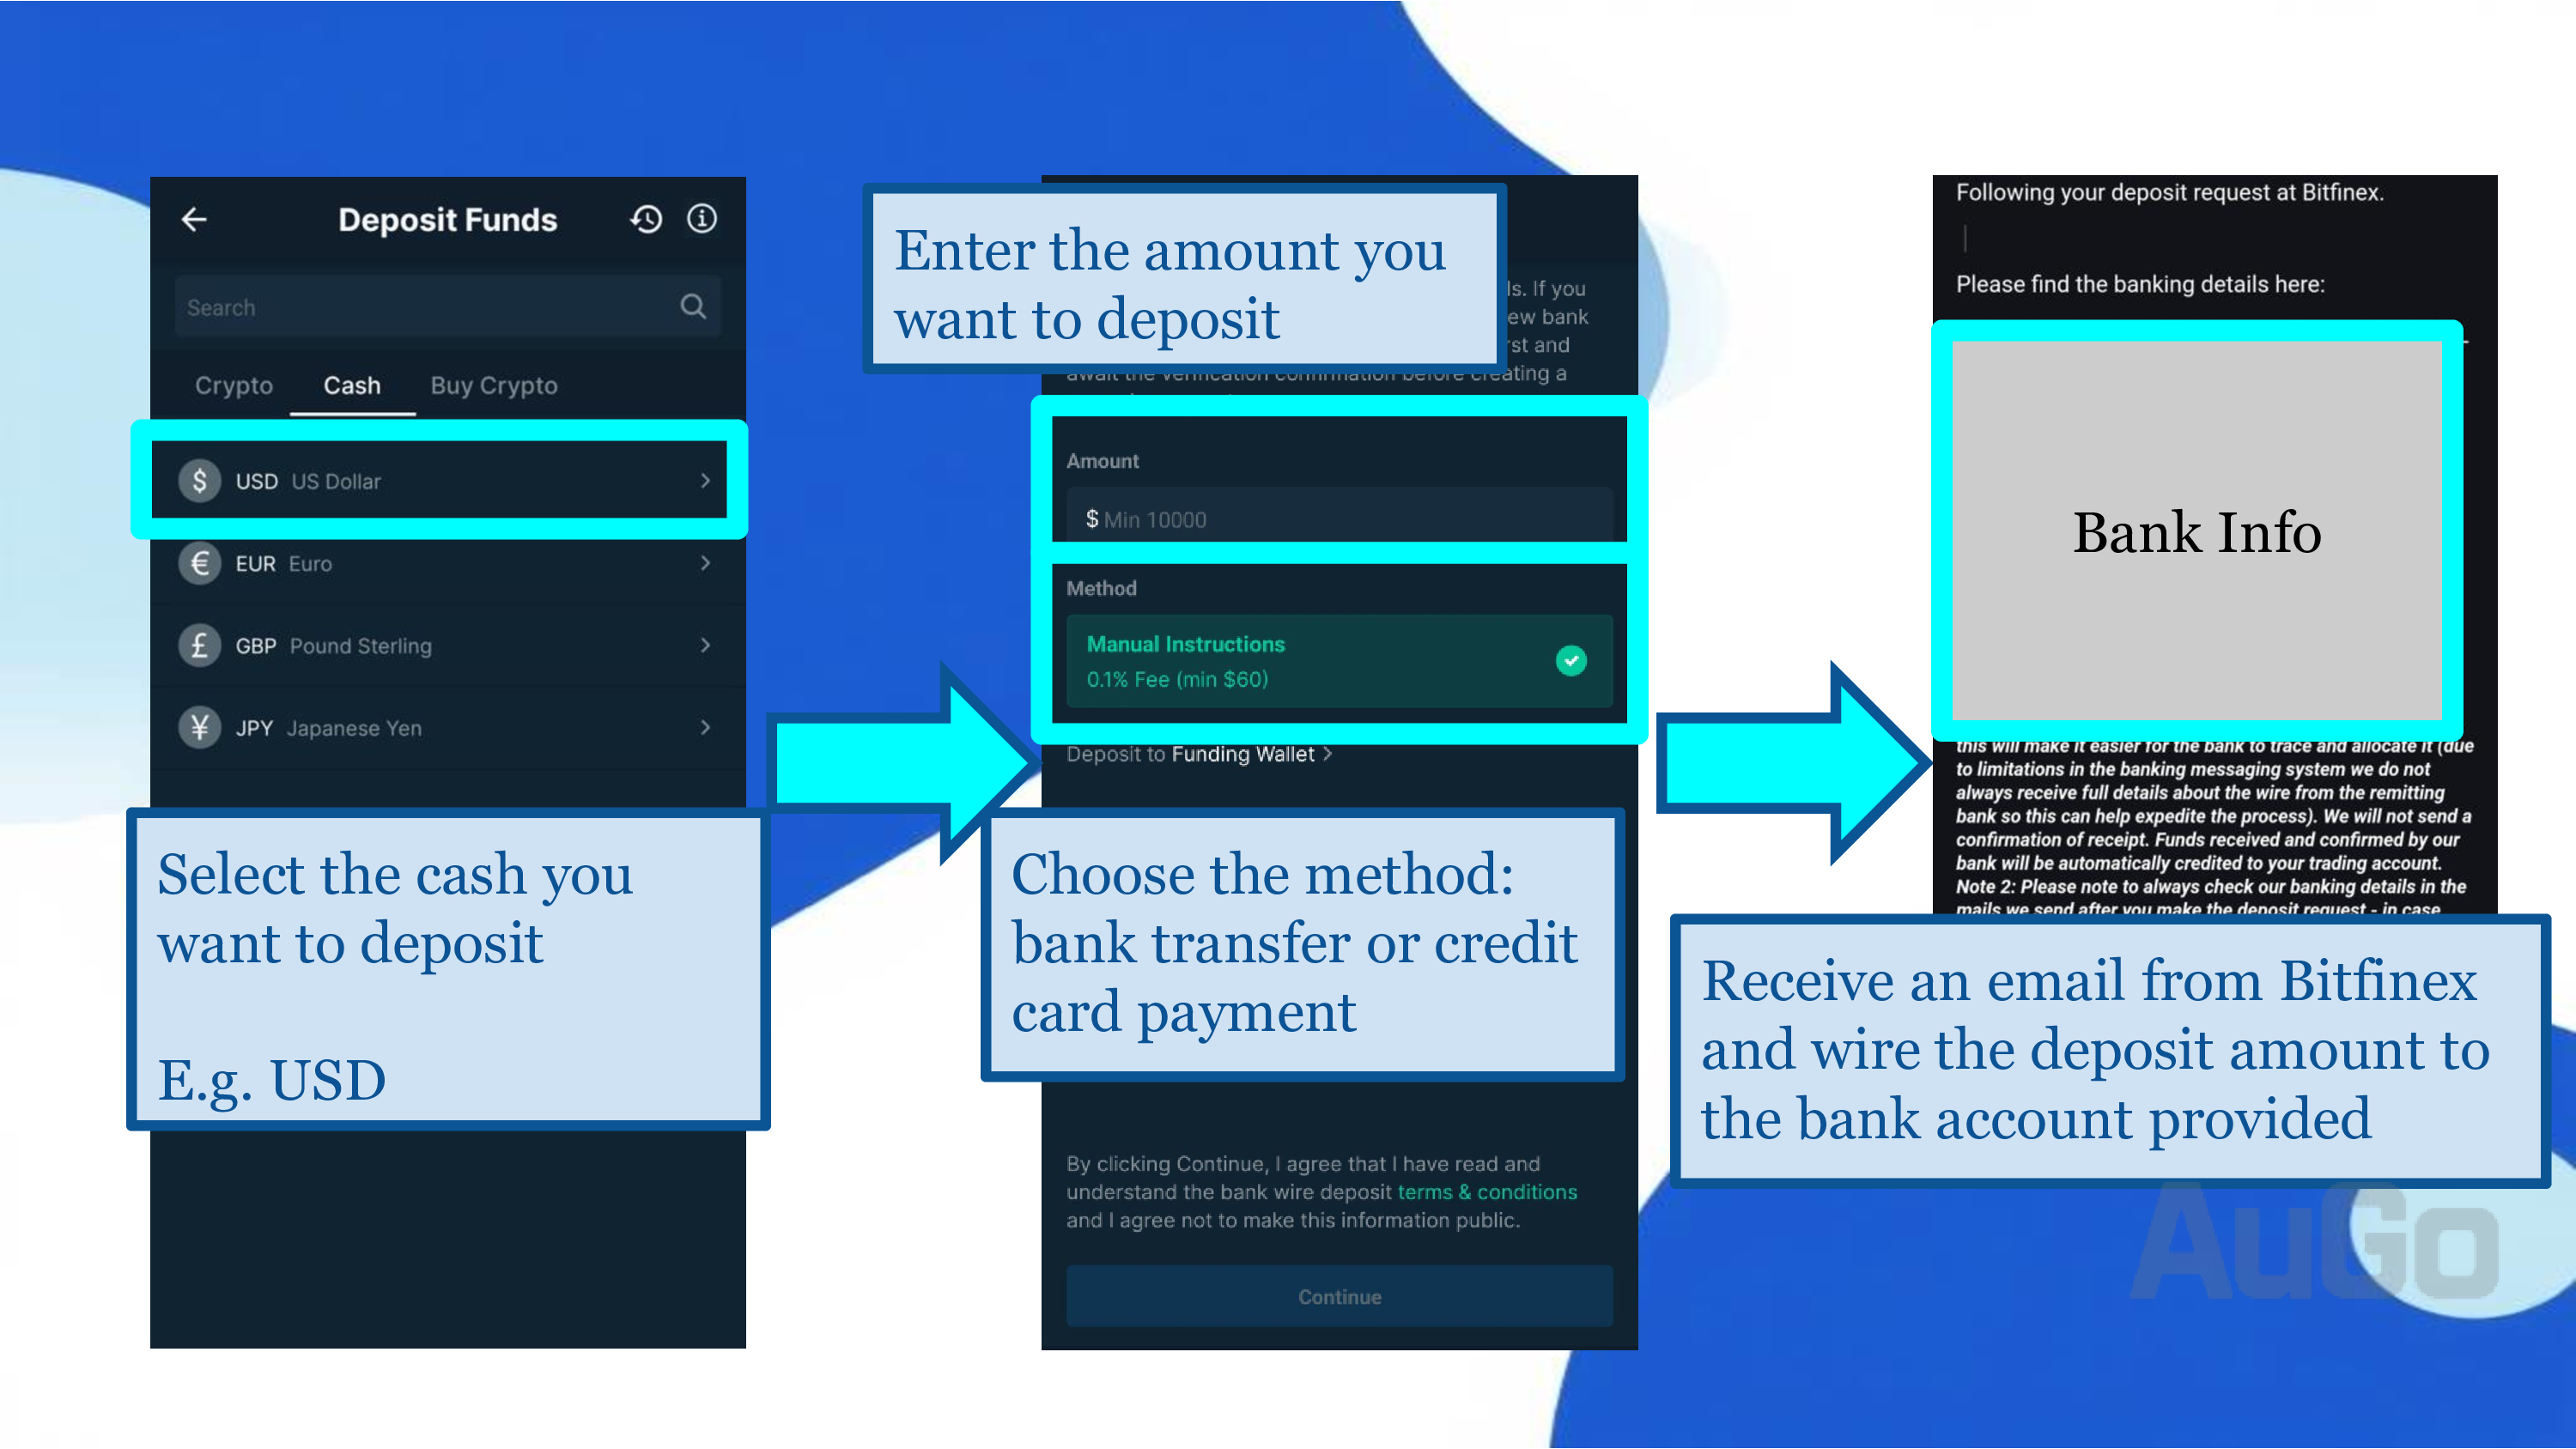
Fiat Deposit
1. Click "Wallet" → "Fiat Deposit".
2. Choose bank transfer or credit card payment. Note: Wire transfers require a minimum amount and a fee of at least $60 or 0.1% of the transfer amount.
3. After you submit a deposit notification, Bitfinex will approve it within about 48 hours. Once approved, you will receive an email with the receiving bank's details. The deposit is successful once the funds arrive.

Transfer to Funding Wallet:
1. Once the funds arrive, go to the "Wallet" page.
2. Find the corresponding currency and click the "Transfer" button.
3. Choose to transfer from the "Exchange" wallet to the "Funding" wallet.
4. Enter the amount and confirm the transfer.
Important: Lending funds must be in the 'Funding' wallet to function correctly.
Bitfinex Deposit & Withdrawal Fees
| Deposit Method | Deposit Fee | Features |
|---|---|---|
| Wire Transfer | 0.100% (Minimum fee: $60/€60) | Suitable for large amounts, longer processing time. |
| Cryptocurrency Deposit | Blockchain network fees, from negligible to $1-2. | Fast, suitable for smaller amounts. |
Question: I'm a beginner with limited funds and no crypto experience. How do I start?
Method 1: Buy USDT via C2C on Other Exchanges
Pros and Cons of C2C Trading
✅ Pros:
- Flexible Operations: Supports various payment methods (bank transfer, FPS, etc.).
- Cheaper Prices: Often cheaper than buying directly from an exchange or via bank wire.
- Fast Settlement: Funds are usually released within 10 minutes.
- No Fees: Direct transactions with individuals or merchants are fee-free.
❌ Cons:
- Risk of Illicit Funds: To avoid receiving "dirty money" (especially when cashing out), choose sellers with high reputation and many transactions.
- Regional Restrictions: Some regions may restrict C2C trading.
Specific Steps:
1. Choose a reputable exchange with C2C functionality (choose one)
2. Registration and Verification
- Complete phone + email verification.
- Prepare your ID + proof of address and follow instructions for KYC verification.
- Approval is usually completed within one business day.
3. Purchase USDT
- Go to the "C2C Trading" page.
- Filter C2C merchants by your local fiat currency.
- Select an order based on quantity, exchange rate, and merchant reputation.
- Pay using the selected method, submit proof of payment, and wait for the release. Bitfinex Deposit Tutorial
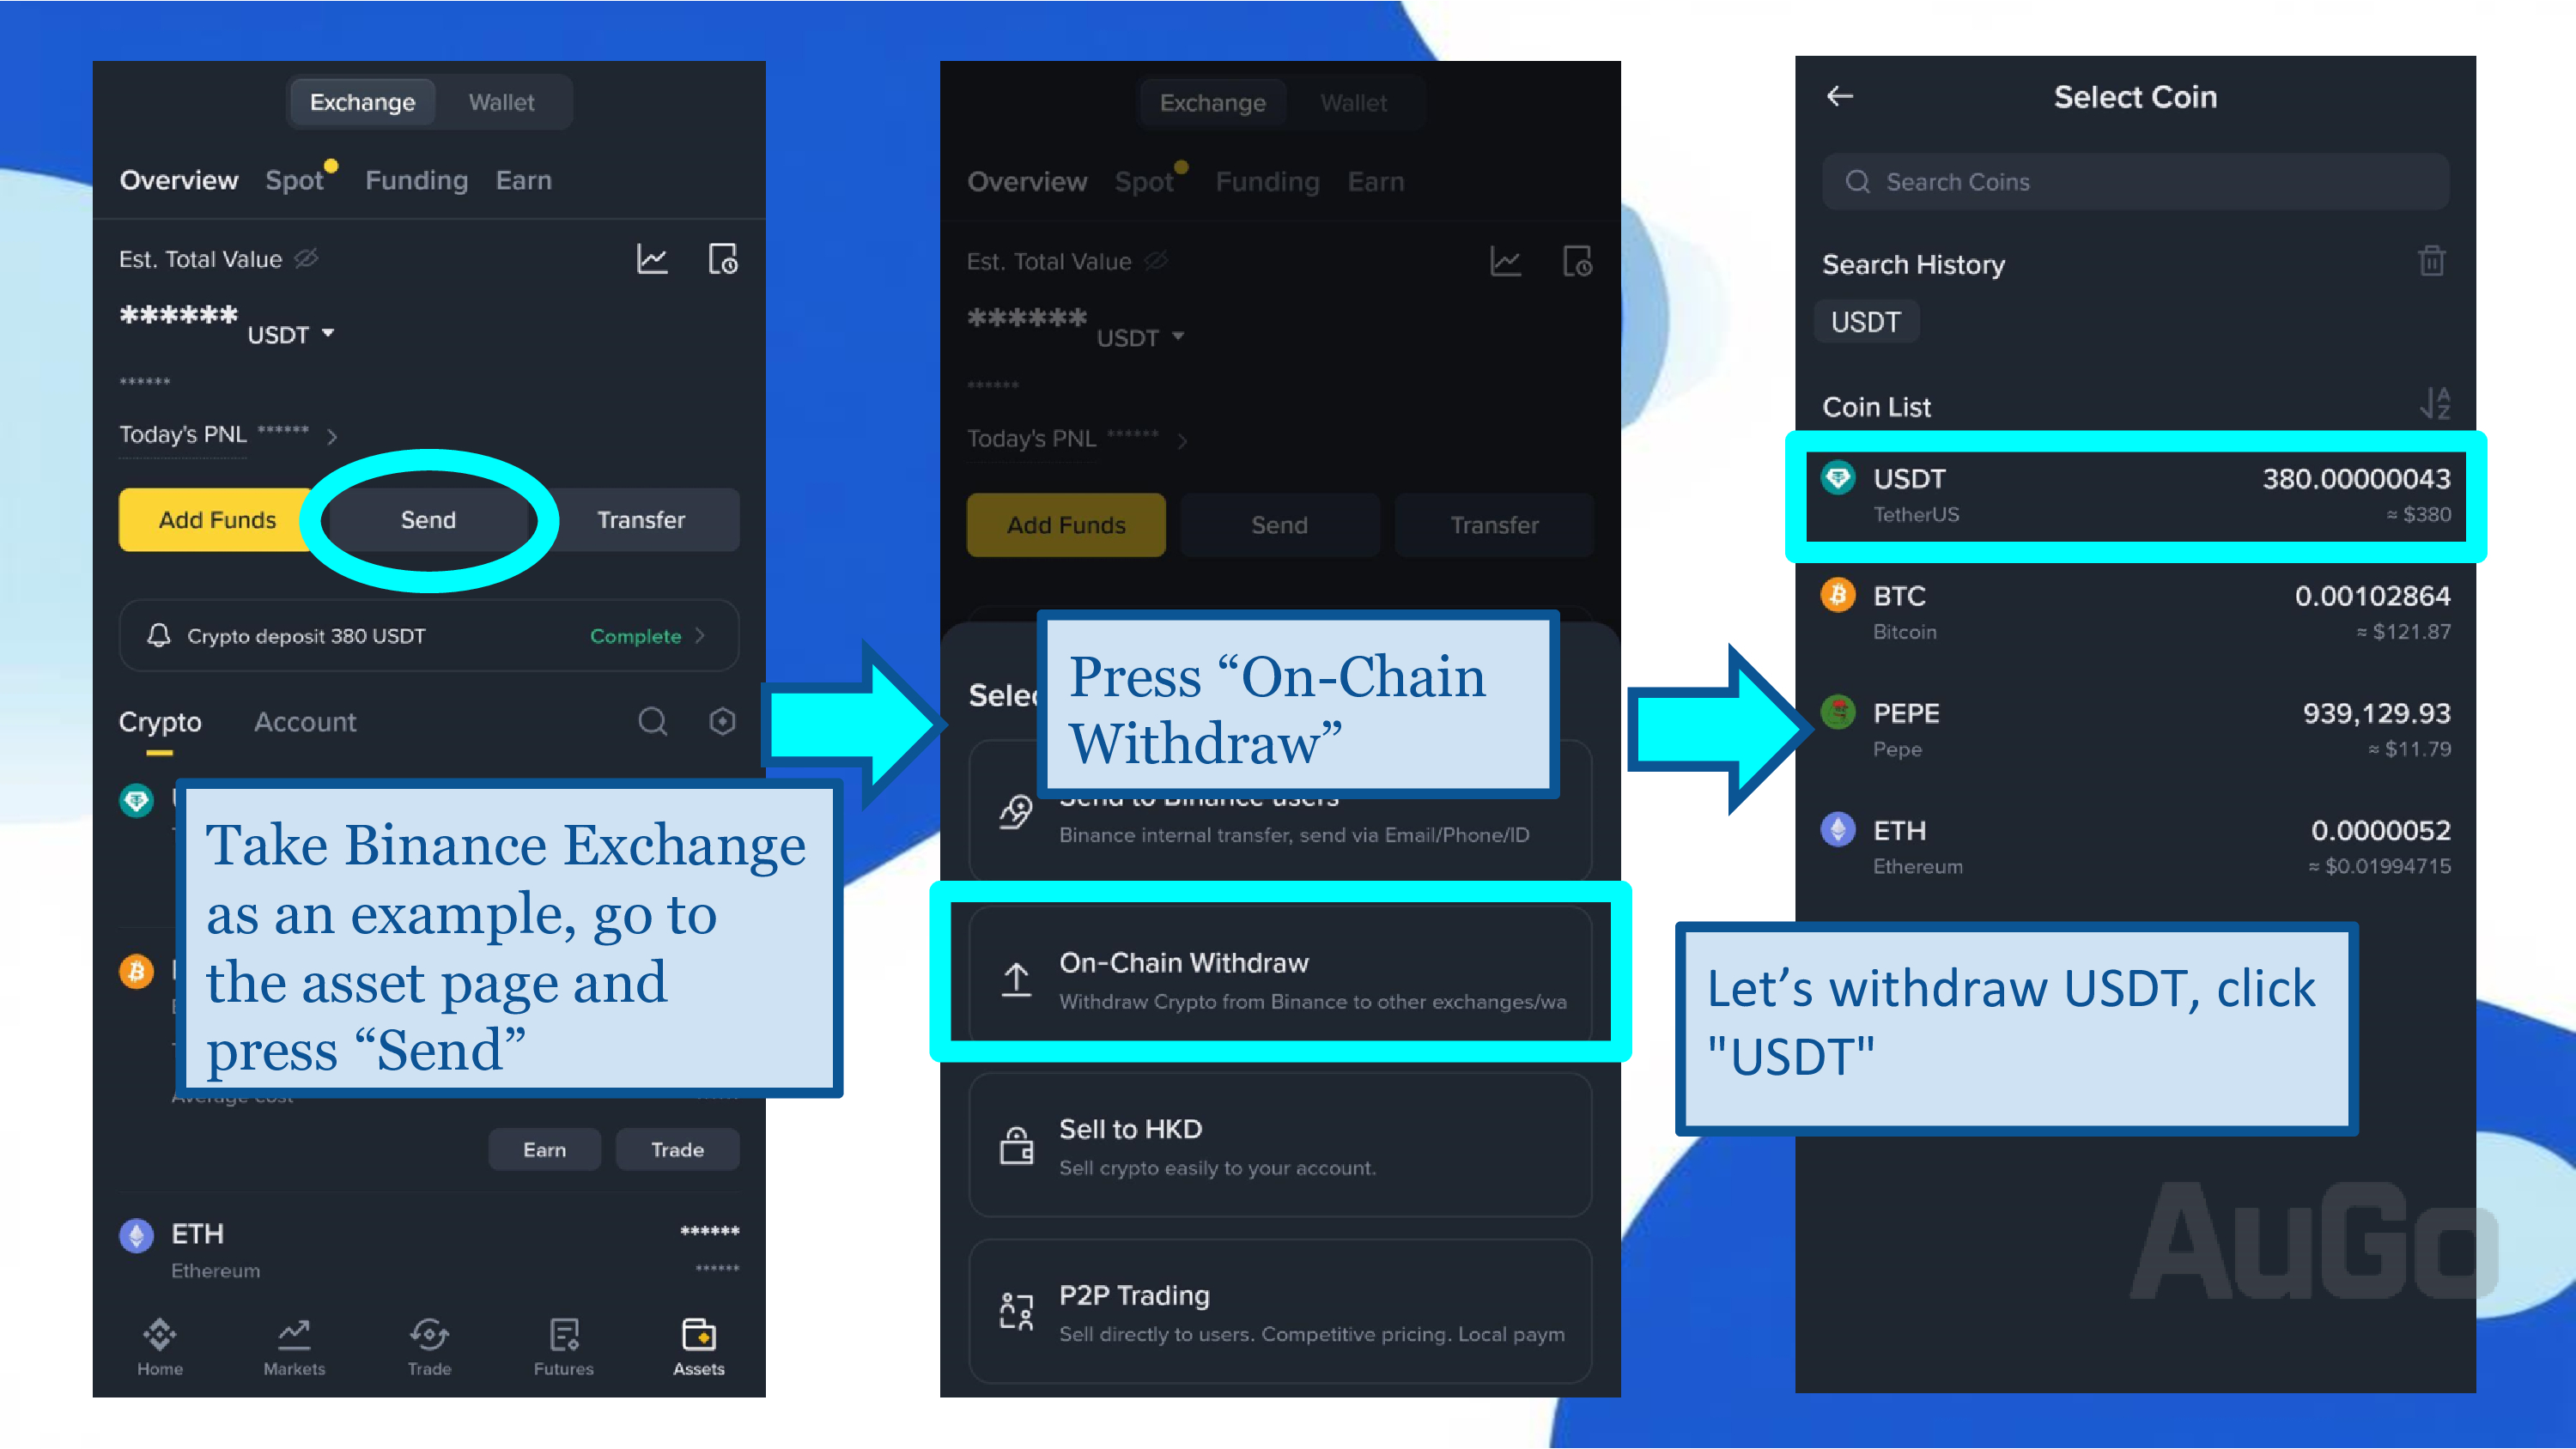
4. Transfer to Bitfinex
- Get a valid USDT deposit address and network from Bitfinex.
- On the withdrawal page of your exchange (e.g., Binance):
- Withdrawal Network: Go to Bitfinex Assets -> Select Crypto (e.g., USDT) -> Withdraw -> Choose the network for the receiving address.
- Withdrawal Address: Paste the receiving network address from Bitfinex.
- Amount: Select the amount you wish to transfer.
5. Confirm Receipt of Cryptocurrency
- Your crypto will be transferred to Bitfinex within a few minutes to a few tens of minutes.
- After receiving the crypto, you can decide whether to convert it to fiat currency.
- For example, to convert USDT to USD, you can trade the USDT/USD pair in the trading section.
⚠️ Important Reminder: Ensure the blockchain network you select matches the sender's network, or your assets will be permanently lost!
Method 2: Purchase from a Local Exchange in Your Region
Exchanges in your region often provide fiat deposit and withdrawal functions, allowing direct bank transfers with lower fees, and you can use the deposited fiat to buy USDT or other cryptocurrencies directly.
✅ Pros:
- Fund Security: Legitimate source of funds.
- Legal Protection: The exchange is protected by your local laws, allowing for recourse in case of financial crises.
❌ Cons:
- Some Trading Pairs May Be Restricted: Some pairs, like buying stablecoins with fiat, may have specific requirements, such as a minimum asset amount.
- Regional Restrictions: Some regions have not yet legalized cryptocurrencies, lacking such exchanges. If so, research local regulations before investing.
- Fees Apply: Deposits and withdrawals may incur fees. Trading fees also apply if you need to convert to a stablecoin for transfer to Bitfinex.
Cryptocurrency Exchanges by Region:
3. Malaysia
4. Singapore
5. Mainland China and Macau
Method 3: Local Over-the-Counter (OTC) Trading
✅ Pros:
- Good Prices: Physical shops often don't charge fees, and coin prices can be lower than online, making it very affordable.
- Instant Access: Funds are transferred immediately after payment at a physical shop, arriving quickly.
- Anonymity (ATMs): Some ATMs support small, KYC-free transactions (depending on local laws), protecting privacy.
❌ Cons:
- Personal Safety Risk: Transactions may require carrying large amounts of cash, making you a target. Choose reputable, long-standing shops and trade during busy hours. Avoid unknown locations!
- Scam Risk: Scammers may use tactics like "lure with low prices then don't transfer" or "third-party transactions." Avoid third-party deals, choose shops with physical locations and good online reviews, and confirm crypto has arrived before completing the transaction.
- Geographic Limitation: Locations are concentrated in metropolitan areas (like Taipei, Hong Kong), making it difficult for those in other areas and requiring travel time.
- Limited Coin Selection: Mainly supports major coins (BTC, ETH, USDT); smaller altcoins are unavailable.
3Step 3: Create a Bitfinex API Key
1. Log in to the Bitfinex website on a desktop computer (API keys cannot be set up on the mobile app).
2. Click the account icon in the top right corner → Select "API".
3. Click the "+ New API Key" button.
4. Give your API key an easily recognizable name.
5. Set the API permissions (please follow these settings strictly):
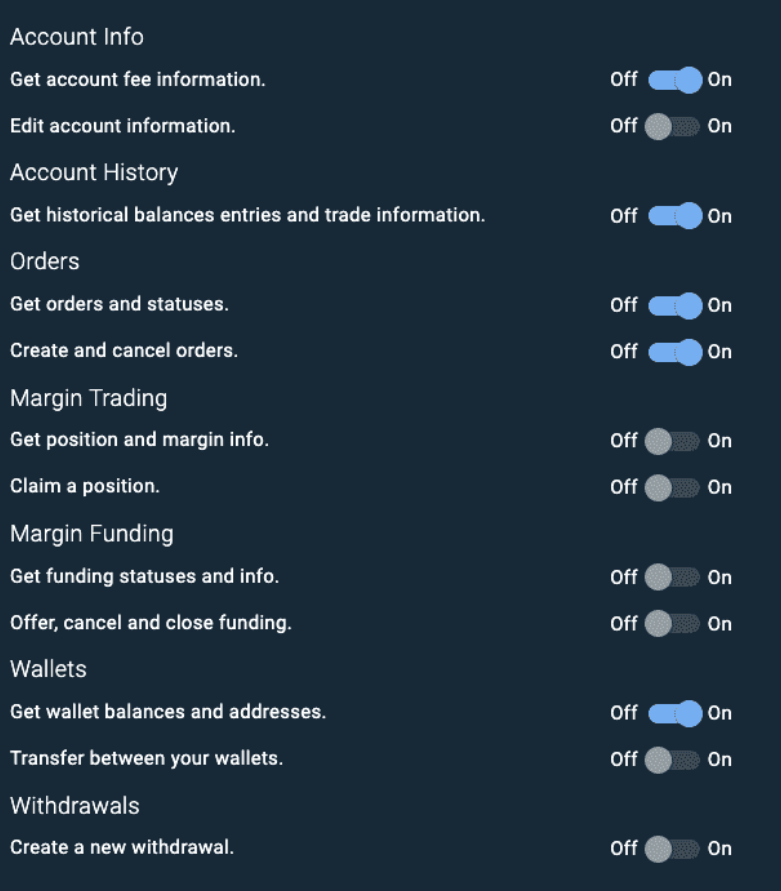
Please configure the API permissions as shown in the image above, then name it. A new key will be generated upon confirmation.
6. Please save your API Key and Secret securely (Note: The API Key and Secret are only displayed once).
Security Warning: Do not share your API Secret with anyone, including customer support, except for setting up the bot.
Bitfinex Withdrawal Guide
How to withdraw your lending profits back to your bank account
Crypto Withdrawal Guide
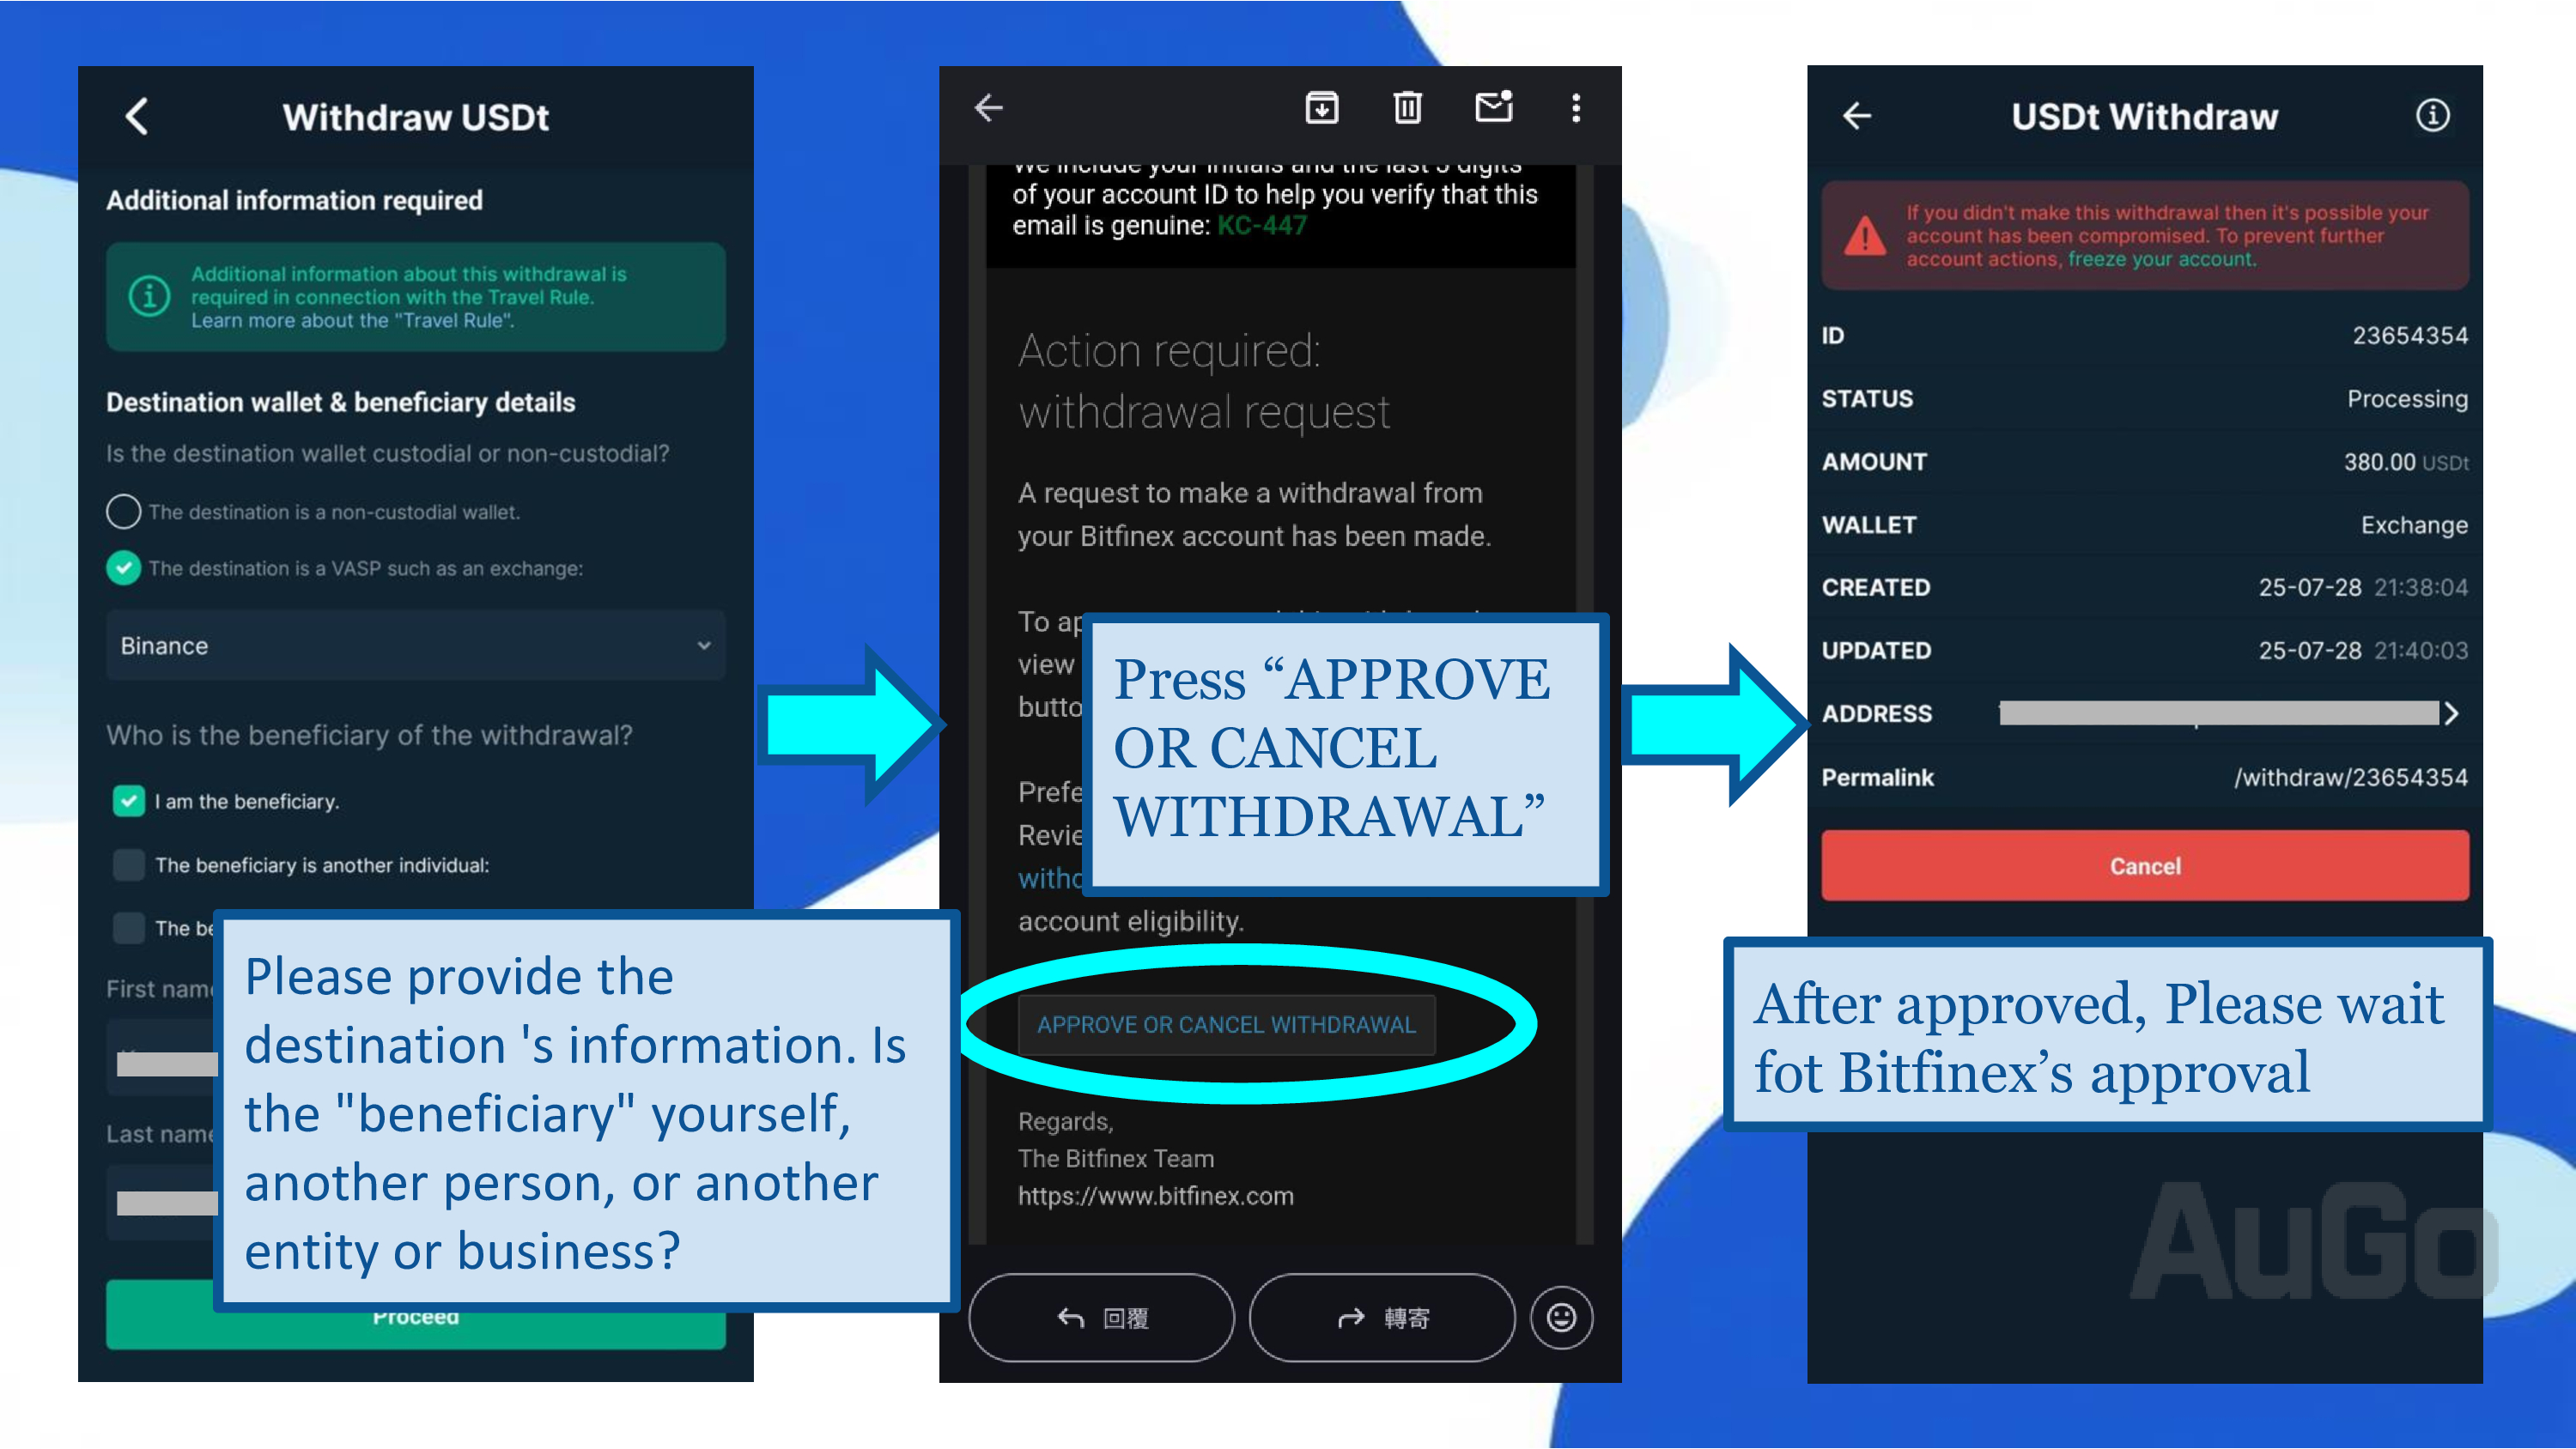
1. Click "Wallet" in the top right → "Withdraw" → Find "Tether" in the left menu → Select "USDT" below.
2. Choose the transfer network (e.g., Ethereum), and fill in the withdrawal address (a USDT address from another exchange or your personal wallet).
3. Enter your 2FA code.
4. You will receive a withdrawal confirmation email; click the link to approve.
5. After receiving the cryptocurrency on the other exchange, you can convert it to fiat via wire transfer or P2P trading.
It is recommended to use the TRC20 network for withdrawals due to lower fees and faster speeds.
Wire Transfer Withdrawal Guide
1. Before withdrawing, you need to convert all your cryptocurrency to USD.
2. Click "Wallet" → "Cash" → "USD Dollar".
3. Fill in your foreign currency bank account information:
- Beneficiary Account Number
- Beneficiary Name (in English)
- Beneficiary Address (in English)
- Beneficiary Bank Name
- Beneficiary Bank Swift Code
- Beneficiary Bank Address
4. After submitting the request, it usually takes 5-10 business days for the funds to arrive.
5. Once the bank receives the funds, they will be converted to your local currency at the wire transfer exchange rate.
Note: Wire transfer withdrawal fees are higher, suitable for large fund transfers, and are subject to overseas income tax regulations.
Bitfinex Withdrawal Fees
| Withdrawal Method | Fee | Processing Time |
|---|---|---|
| Crypto Withdrawal (USDT) | Approx. 0.001 - 2 USDT (depends on network) | Seconds to hours |
| Wire Transfer (Regular) | 0.1% (Minimum fee: $60 / €60) | 2-7 business days |
| Wire Transfer (Express) | 1% (Minimum fee: $60 / €60) | 1 business day |
Bitfinex Security Information
Platform Security
Founded in 2012, Bitfinex is one of the industry's veteran exchanges, having successfully weathered multiple bull and bear market cycles with a strong security record.
Group Background
Bitfinex and Tether, the issuer of the largest stablecoin USDT, belong to the same group, ensuring financial stability. It holds over $90 billion in US Treasury bonds and has high credibility as the issuer of the largest fiat-backed stablecoin.
Market Position
Currently the 9th largest spot exchange globally, with a large base of loyal users and Bitcoin whales, ensuring ample market liquidity.
Security Tips: Despite Bitfinex's strong security record, users are still advised to:
- Enable Two-Factor Authentication (2FA)
- Use a unique and strong password
- Regularly check API key permissions
- Use a hardware wallet for cold storage of large funds
Frequently Asked Questions
Theoretically, there is no limit, but Bitfinex has a minimum loan amount of $150 per offer. Sufficient liquidity is necessary for the lending bot to perform effectively. We recommend investing at least $5,000 equivalent to achieve reasonable and stable returns.
As long as the API permissions are set correctly, the lending bot itself does not introduce any additional risk. Although a system failure could temporarily halt lending, the bot itself will not cause you to lose your principal.
Earnings are calculated and distributed directly by Bitfinex to your funding wallet daily at 01:30 UTC. Interest is calculated every second. If a borrower repays within one hour, interest is still calculated for the full hour. The AuGo.it platform only executes strategies and does not handle any of your funds.
Yes, you can pause or completely stop the bot at any time. Loans that have already been issued will continue until their expiration date, but the system will not create new loan offers.
Recommendations:
1) Use high-demand currencies, such as USD and USDT.
2) Use the recommended parameter settings.
3) Set up dual bots for the same currency.
4) After setting up the bot, avoid manual operations.
Ready to Start Your Automated Lending Journey?
Register now to enjoy a 10-day free trial and experience the stable returns of smart lending.